


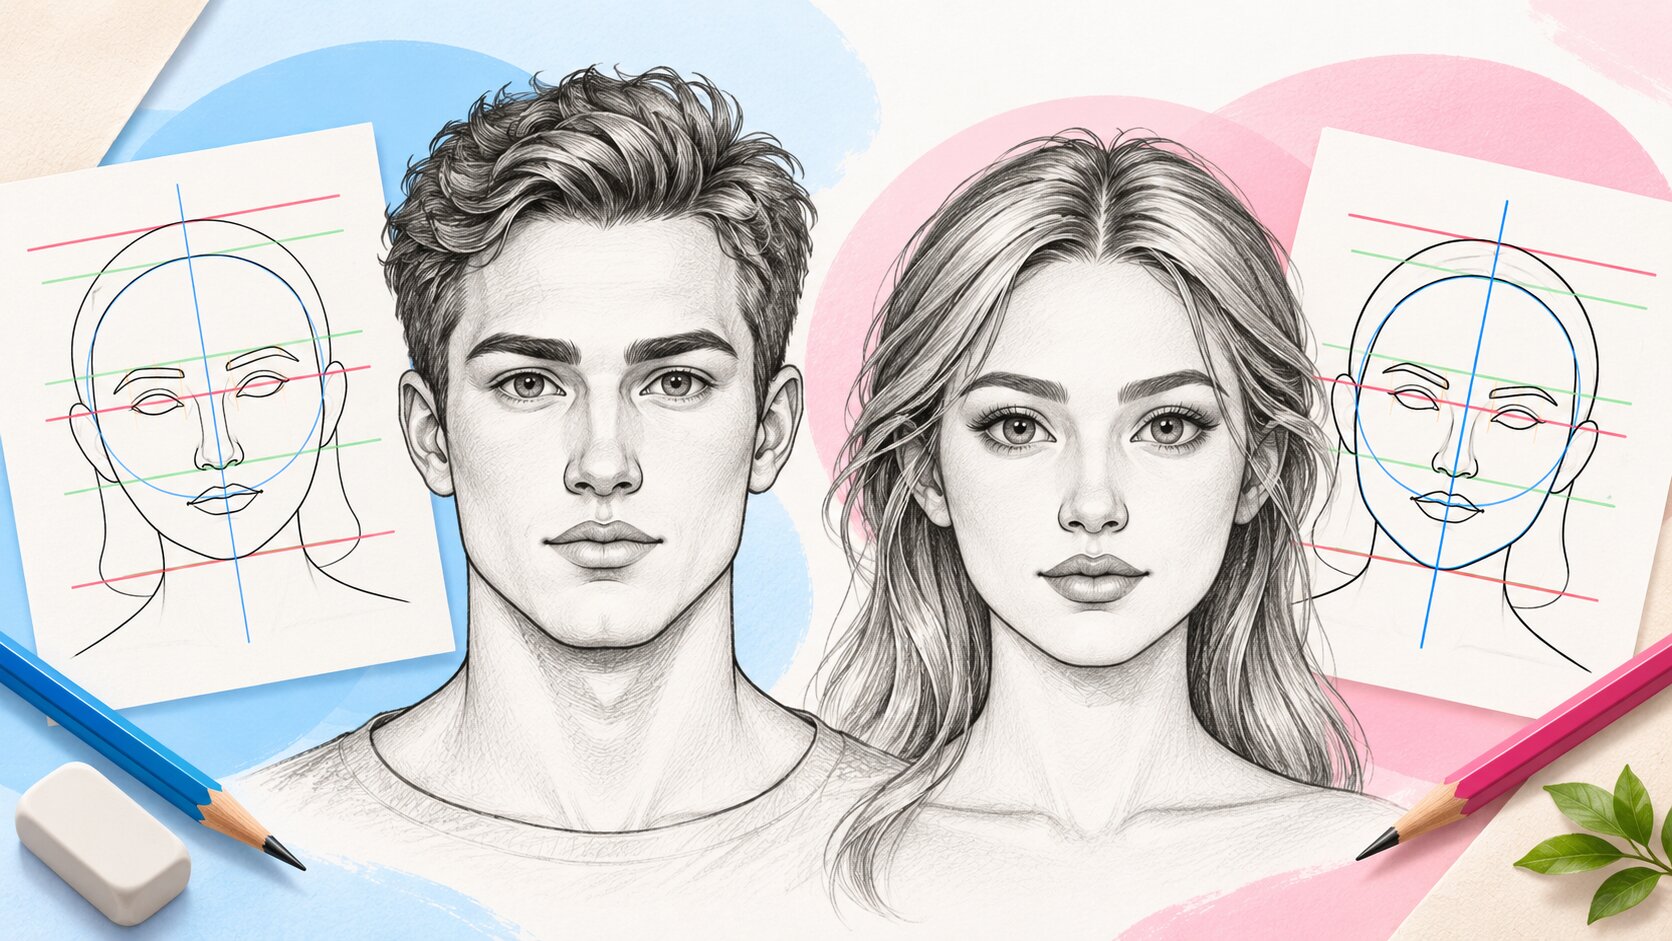
Drawing a human face may seem difficult at first, especially when trying to position the eyes, nose, mouth, and ears correctly. However, learning how to draw a human face step by step becomes much easier when you start with simple shapes and understand basic facial proportions.
You don't need advanced drawing skills to begin. By using a circle, a few guidelines, and simple outlines, you can gradually build a balanced face.
In this beginner-friendly guide, we'll explore how to draw a face from the front, understand facial proportions, and create both male and female face drawings using techniques featured in Drawing Desk's step-by-step drawing lessons.
What Do You Need to Draw a Human Face?
Before starting your face drawing, prepare a few basic tools.
- A pencil and eraser for sketching on paper.
- A ruler to help draw facial guidelines.
- A sketchbook or drawing paper.
- A drawing app if you prefer practicing on a screen.
Beginners should use light strokes when creating guidelines. These temporary lines help position facial features and can be erased once the drawing is complete.
Understanding Basic Human Face Proportions
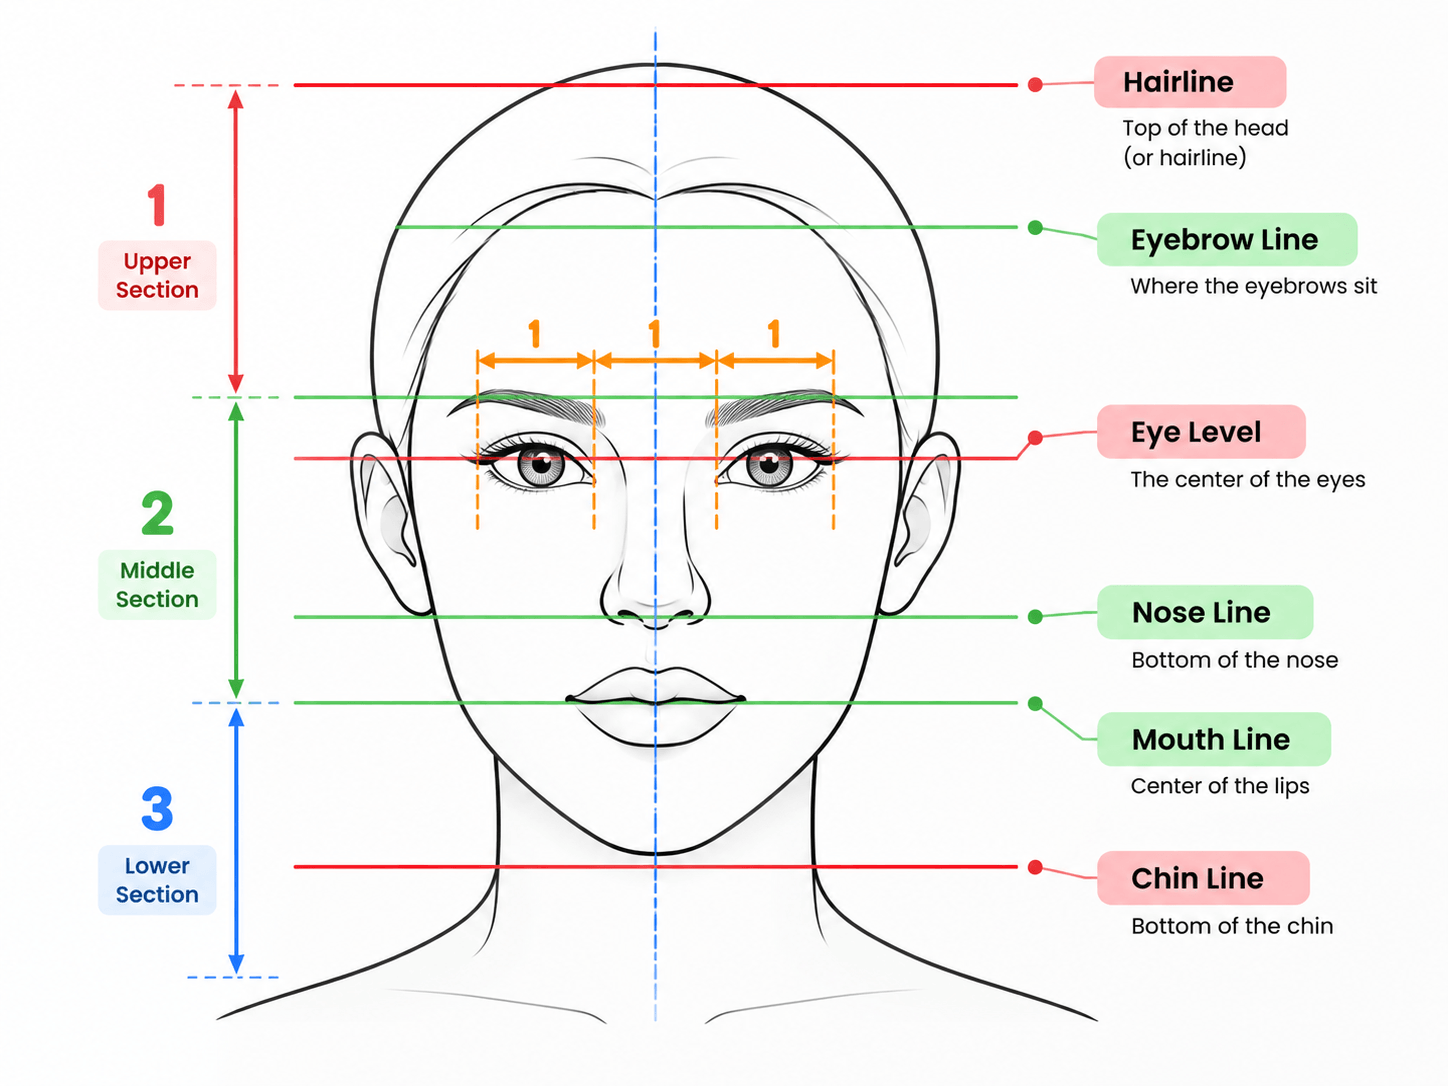
One of the most important skills in portrait drawing is understanding facial proportions.
Facial proportions describe how different features relate to one another. When drawing a face from the front, artists often use simple guidelines to establish the position of the eyes, nose, mouth, and chin.
A useful beginner approach is to divide the face into sections using horizontal and vertical lines.
The vertical centerline helps maintain symmetry, while horizontal guidelines make it easier to position individual features.
Remember that these guidelines are starting points, not strict rules. Real faces have different shapes, sizes, and proportions.
How to Draw a Human Face Step by Step
Follow these eight steps to create a basic front-facing human face drawing.
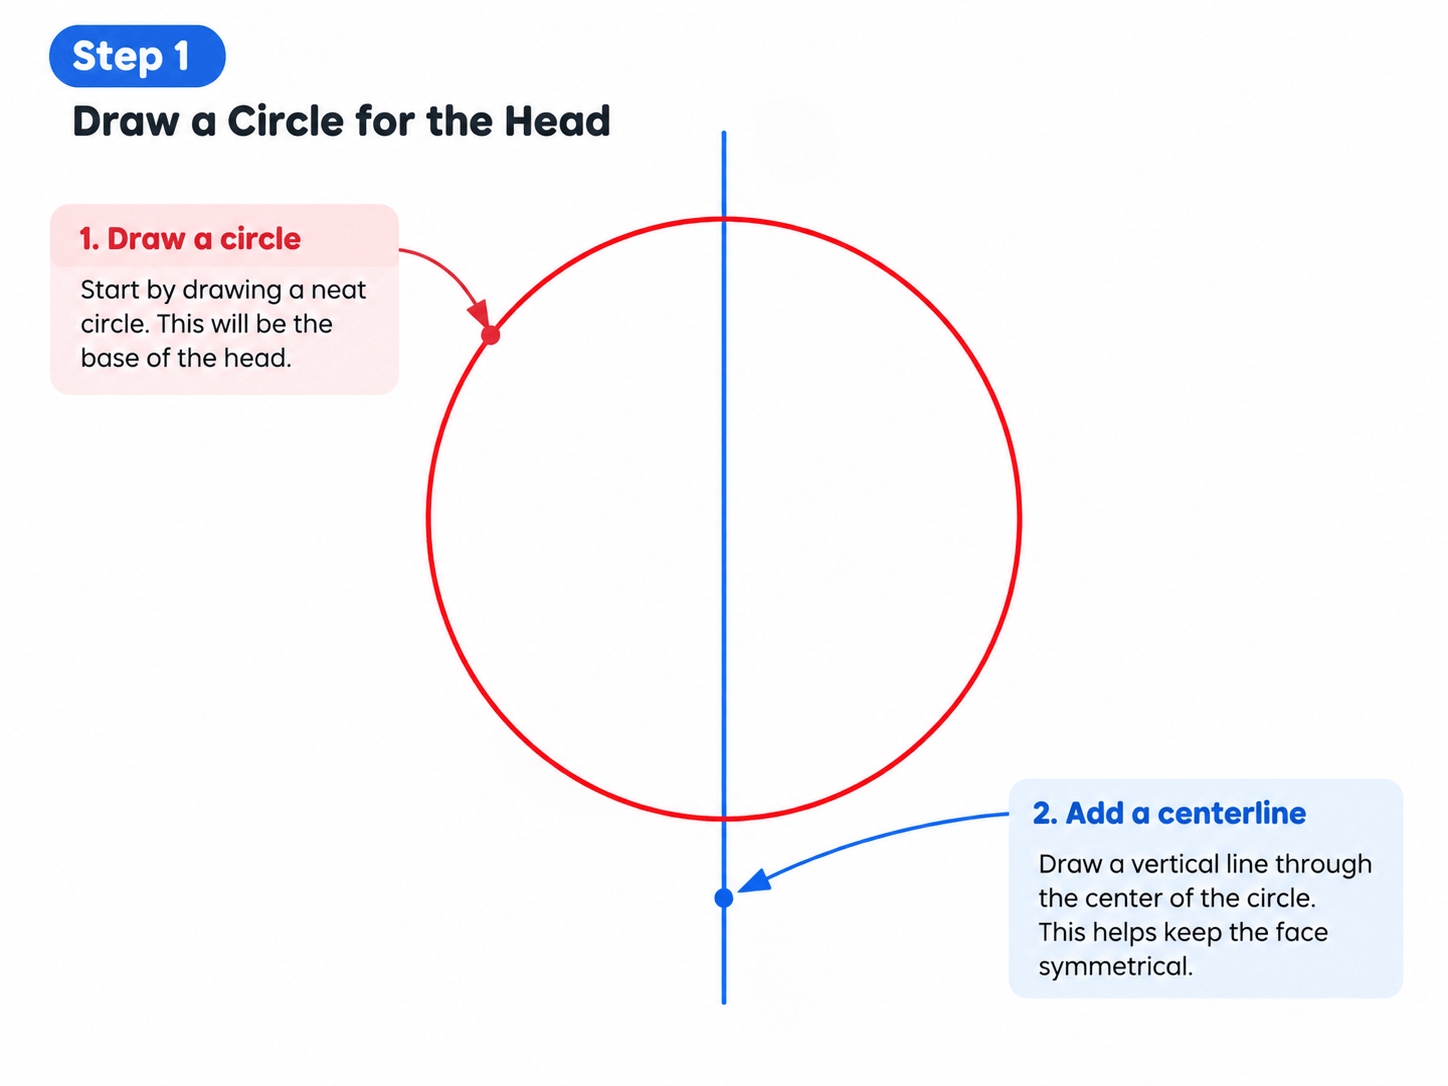
Step 1: Draw a Circle for the Head
Start by drawing a neat circle in the upper-middle area of your page.
This circle forms the foundation of the head and helps establish the overall proportions of your drawing.
Next, draw a straight vertical line through the center of the circle, extending slightly below it. This line will help you align the facial features.
Don't worry about making the circle perfect. Focus on creating a simple structure that you can build upon.
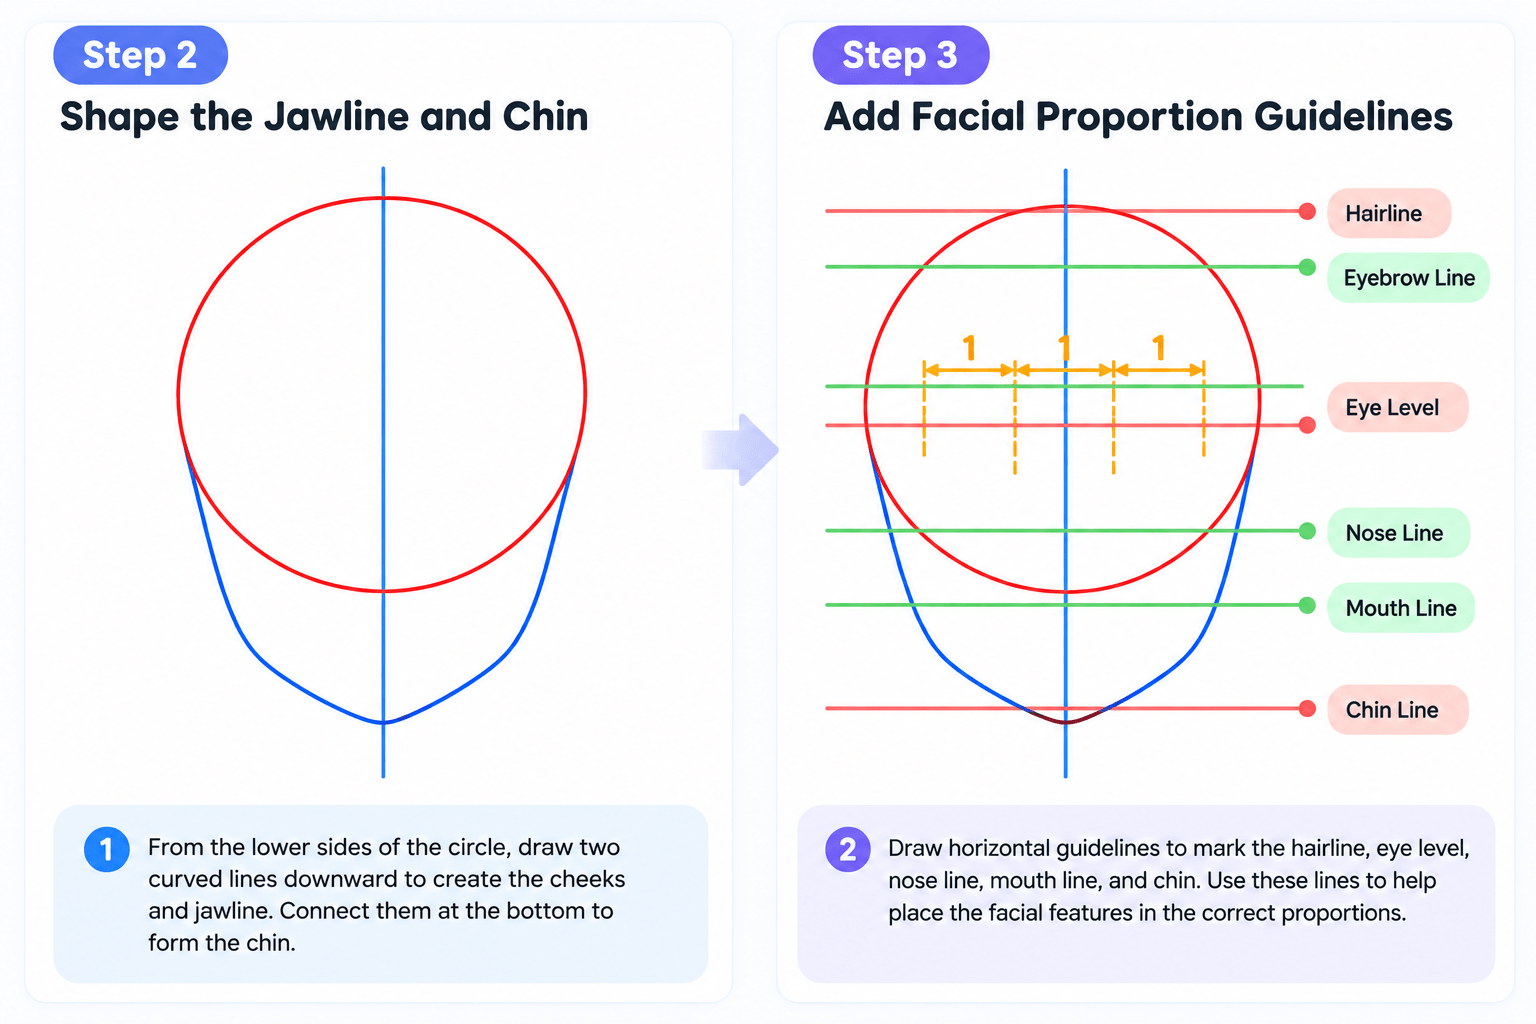
Step 2: Shape the Jawline and Chin
From the lower sides of the circle, draw two lines extending downward toward the chin.
Gently curve these lines inward to create the cheeks and jawline.
Connect them at the bottom to complete the basic face shape.
You can experiment with different jawlines. A wider or more angular jaw creates a different appearance from a narrower, softly curved face.
At this stage, concentrate on keeping the head balanced around the centerline.
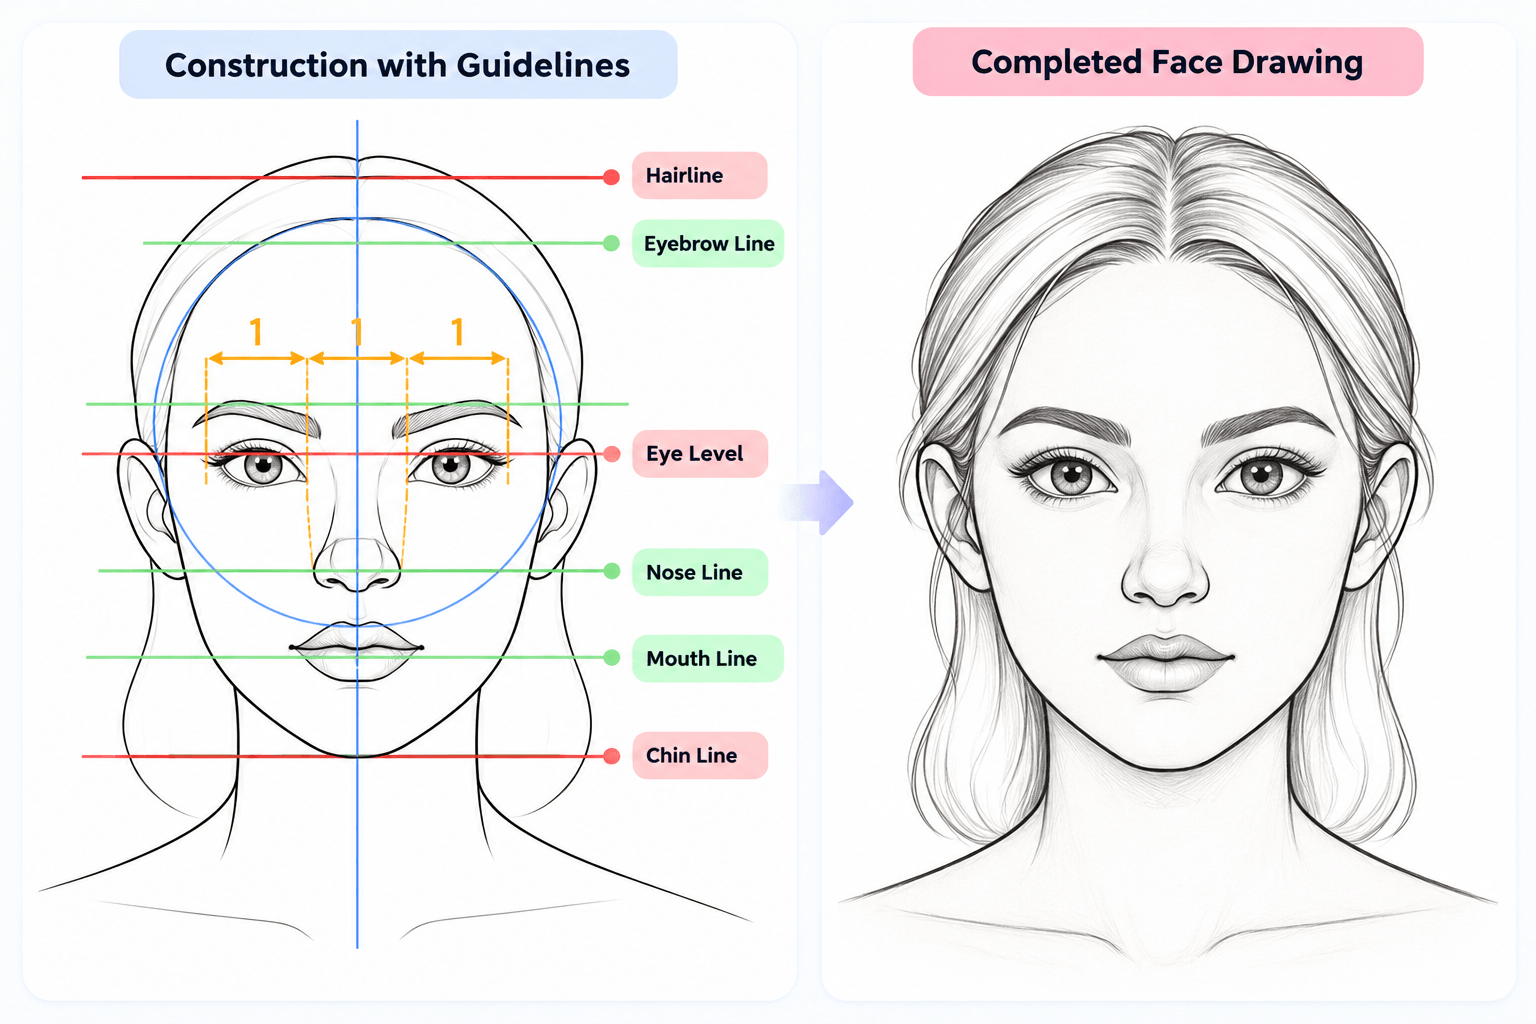
Step 3: Add Facial Proportion Guidelines
Now draw horizontal guidelines across the face.
Use these lines to identify important areas, including the hairline, eye level, nose position, and chin.
You can also divide the central area into smaller sections to help with eye spacing.
These reference lines are especially useful for beginners because they make facial feature placement easier to understand.
Step 4: Draw the Neck, Hairline, and Ears
Sketch two lines extending downward from the sides of the jaw to form the neck. Add gently sloping lines for the shoulders.
Next, draw the hairline near the upper part of the face. Its shape can vary depending on the hairstyle you want to create.
Position the ears on both sides of the head, using the eye and nose guidelines as approximate references.
Keep the ear shapes simple at first. You can add smaller details later.
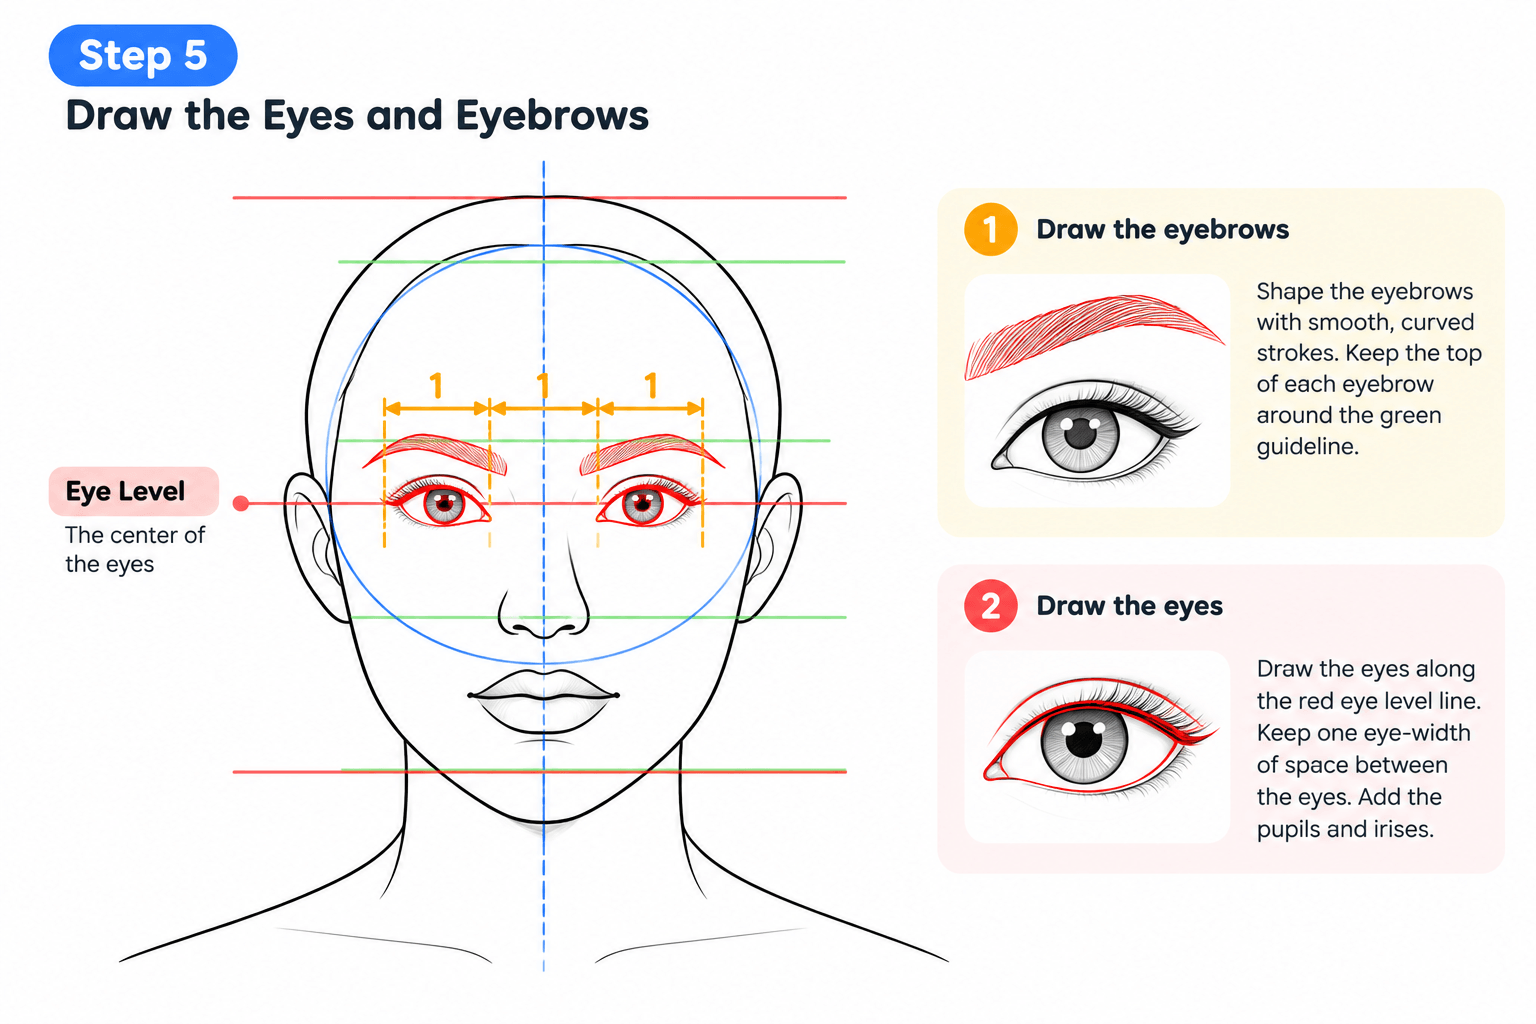
Step 5: Draw the Eyes and Eyebrows
The eyes are among the most expressive features of the human face.
Start by marking where each eye will sit along the eye guideline. A common beginner reference is to leave approximately one eye-width of space between the eyes.
Sketch the upper and lower eyelids using smooth, curved lines.
Then add the irises, pupils, and eyebrows.
Try to keep both eyes aligned while allowing natural differences in their shapes.
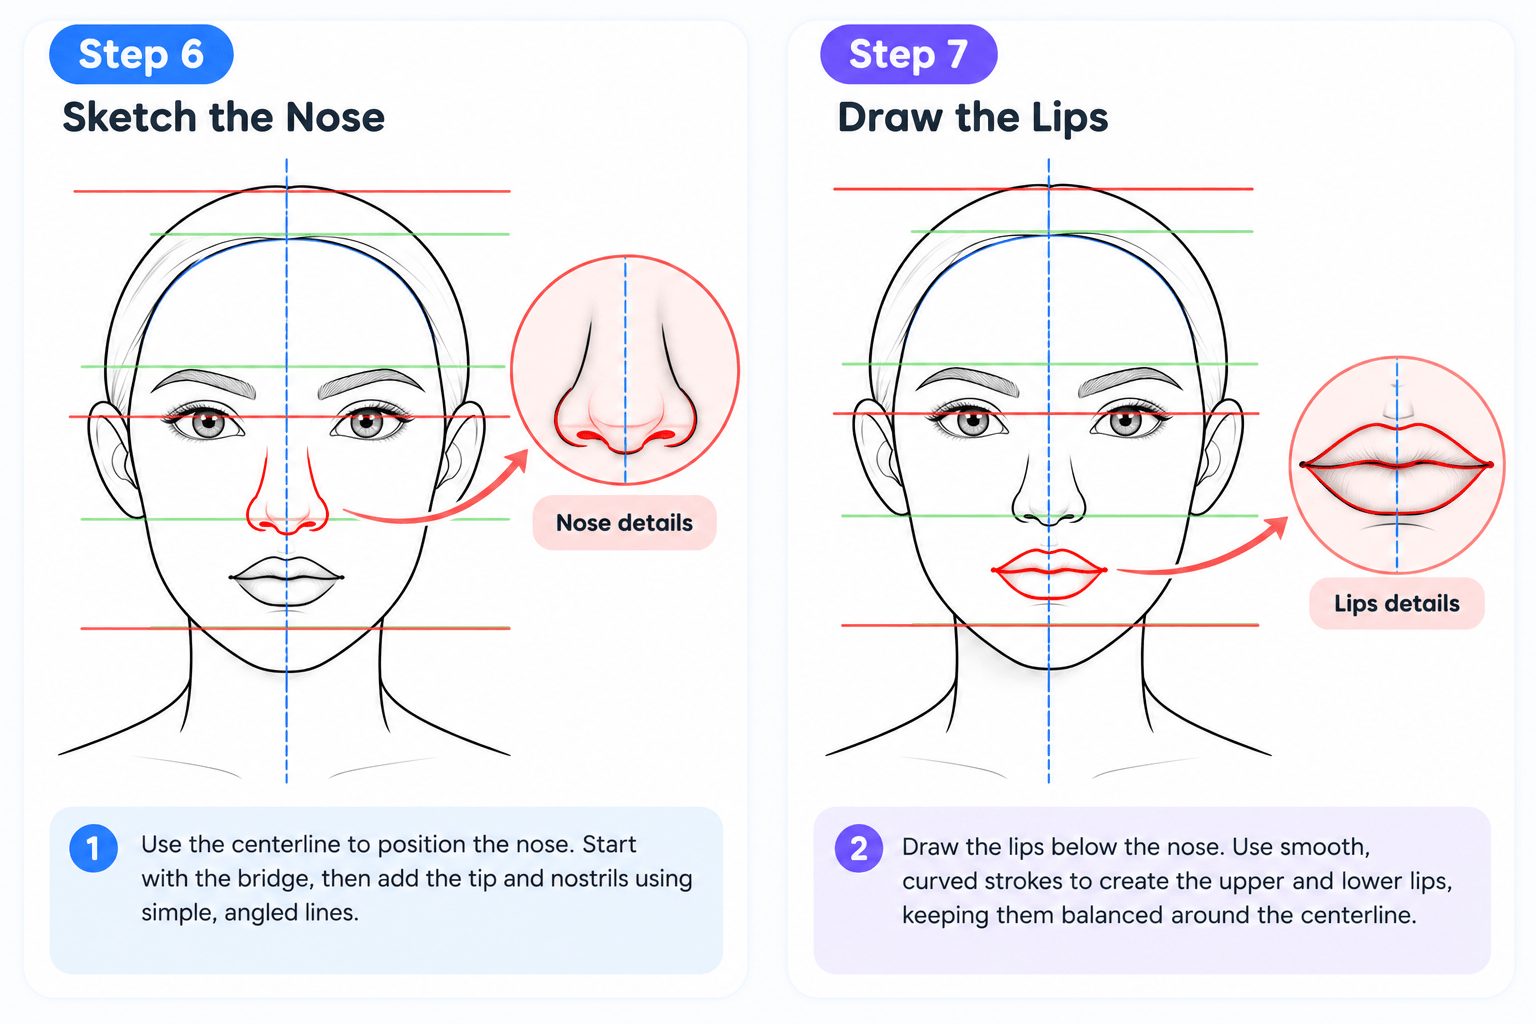
Step 6: Sketch the Nose
Use the vertical centerline to position the nose beneath the eyes.
Begin with light lines to establish the bridge, then sketch the nose tip and nostrils.
Avoid making every edge too dark. In many drawing styles, a few carefully placed lines are enough to suggest the nose's structure.
Check that the nose aligns naturally with the eyes and the rest of the face.
Step 7: Draw the Mouth and Lips
Position the mouth below the nose and above the chin.
Start with a gently curved line to indicate where the lips meet. Then add the outline of the upper and lower lips.
Pay attention to the width of the mouth and how it relates to the nose and eyes.
Use smooth strokes to create natural curves rather than forcing both sides to look identical.
Step 8: Refine the Face and Remove Guidelines
Once all the facial features are in place, review your drawing.
Adjust the jawline, eye spacing, nose shape, or mouth position if necessary.
Darken the final outlines and remove unnecessary construction lines.
You can also add hair details, gentle shading, or small facial features to give your portrait more personality.
Your basic human face drawing is now complete!
How to Draw Male and Female Faces
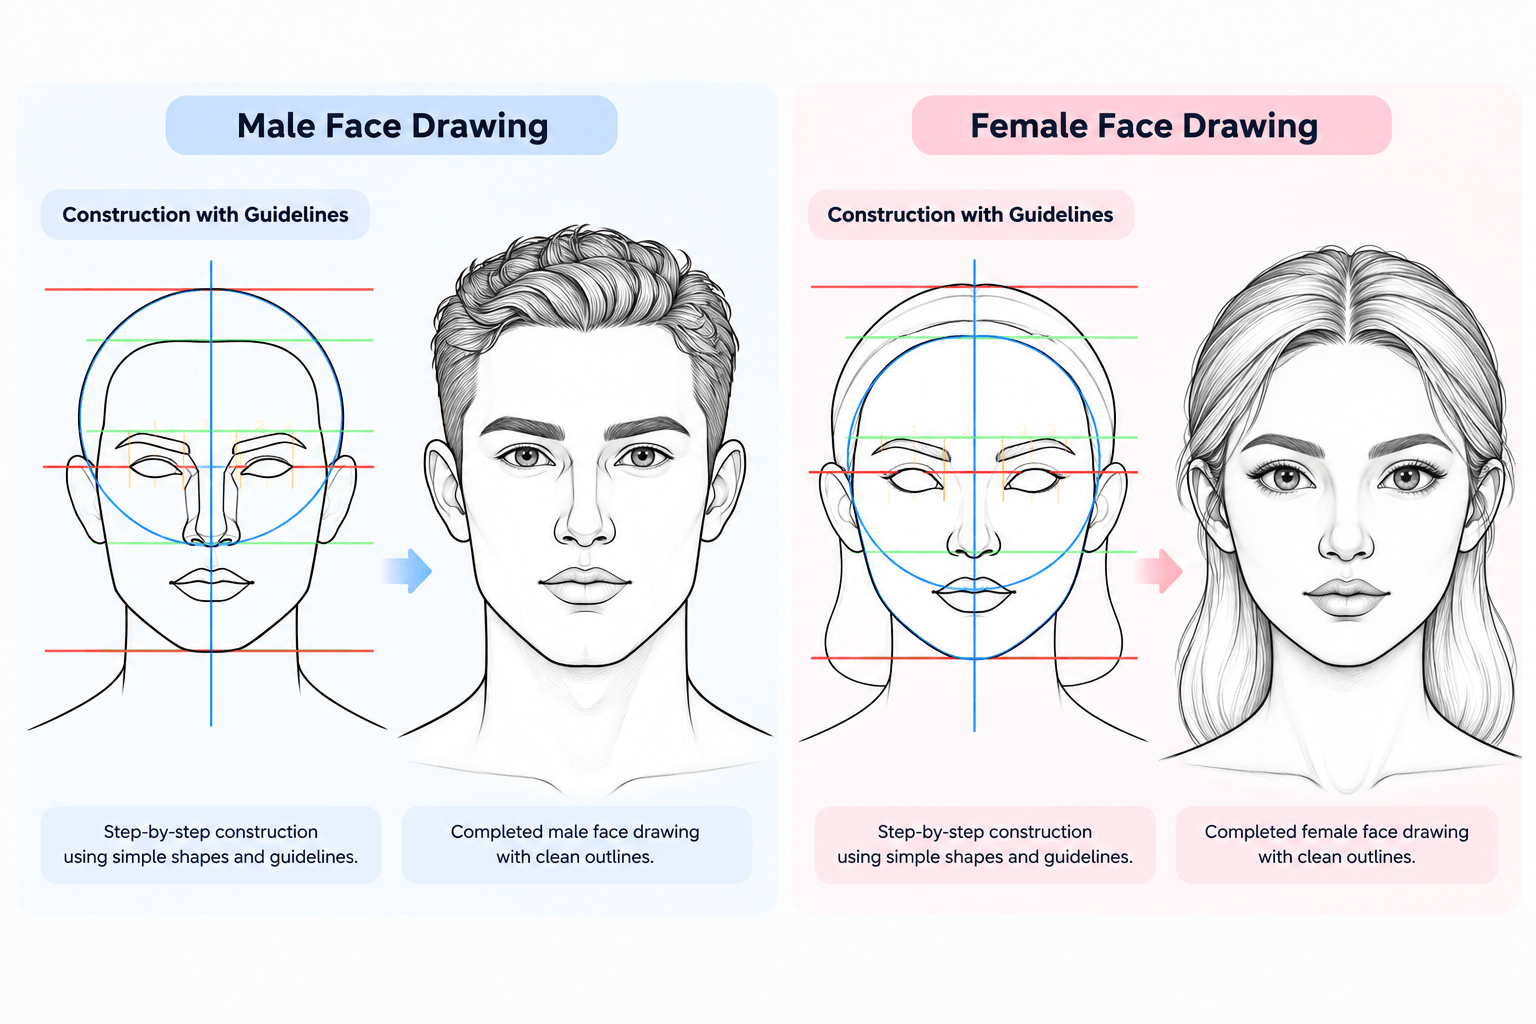
The same basic drawing method can be used to create many different faces.
Both male and female portraits begin with similar foundations: a head shape, centerline, proportion guidelines, and carefully positioned facial features.
The main differences come from the individual characteristics you choose to draw.
For example, you can experiment with:
- Angular or softly curved jawlines.
- Different face widths and chin shapes.
- Eye and eyebrow shapes.
- Nose and lip proportions.
- Hairlines and hairstyles.
Rather than following fixed rules for male and female faces, observe how these features vary between individuals.
In Drawing Desk, the lessons Basic Placing of Male Face and Basic Placing of Female Face demonstrate these construction techniques through separate guided examples.
Common Mistakes Beginners Make When Drawing Faces
When learning to draw a human face, small mistakes in proportion can affect the overall appearance.
Placing the eyes too high: Beginners sometimes position the eyes close to the top of the head. Remember to leave enough room for the forehead and upper skull.
Drawing without guidelines: Skipping construction lines can make facial features difficult to align.
Making both sides perfectly identical: Guidelines help with balance, but natural faces are not perfectly symmetrical.
Adding details too early: Focus on the overall head shape and feature placement before drawing eyelashes, hair strands, or shading.
Pressing too hard while sketching: Light construction strokes make corrections much easier.
Practicing these fundamentals will help you become more comfortable drawing different faces.
Practice Face Drawing With Drawing Desk
Understanding facial proportions is easier when you can see how a drawing develops from its first shape to the final outline.
Drawing Desk offers guided lessons that demonstrate this process step by step.
The Basic Placing of Male Face and Basic Placing of Female Face lessons introduce beginners to head construction, proportion guidelines, and facial feature placement.
You can follow each stage, observe how the face develops, and use the Whiteboard feature to practice drawing on your own.
As you become more confident, try drawing faces with different expressions, hairstyles, and proportions without relying on every guideline.
Frequently Asked Questions About Drawing Human Faces
What is the easiest way to draw a human face?
Start with a circle, add a vertical centerline, and sketch the jawline. Then use horizontal guidelines to position the eyes, nose, and mouth before refining the final outline.
How do beginners learn facial proportions?
Beginners can practice by dividing the head into simple sections and using reference lines to understand feature placement. Observing real faces helps develop a better understanding of natural variation.
Can I learn to draw a face without drawing experience?
Yes. Starting with basic shapes and practicing one facial feature at a time makes face drawing more approachable for beginners.
What should I practice first when drawing faces?
Begin with head shapes, jawlines, and facial guidelines. Once you understand these foundations, practice drawing eyes, noses, mouths, and ears.
Start Drawing Human Faces With Confidence
Learning how to draw a human face takes practice, but every portrait begins with a few simple shapes.
By understanding facial proportions and following a step-by-step approach, you can gradually improve your ability to draw balanced, expressive faces.
Start with the basic construction, practice different features, and explore guided face drawing lessons in Drawing Desk to continue developing your skills.


